Acme.sh with NGiNX
First you have to install acme.sh. I like using acme.sh because it’s all bash based. As with all posts I take no responsibility for anything and this is more of a quick help instead of a full guide.
I have a script that I use to deploy my WordPress sites. The only thing I recommend is if you use it make sure to add the xml-rpc.php block. I haven’t added that to it yet. Here’s the link. You’re more than welcome to use it. This is always getting updated so I can’t say it’s going to be reliable. LINK
Install acme.sh with the following
curl https://get.acme.sh | sh
This will also install a cron in your crontab -l
Configure acme.sh to autoupdate since sometimes it will start to fail if LetsEncrypt changes their API
acme.sh --upgrade --auto-upgrade
Configure acme.sh to use LE instead of ZeroSSL by default
acme.sh --set-default-ca --server letsencrypt
Now it’s time to deploy a cert. There are numerous ways to do this. My preferred way is to use the CloudFlare API this way you can deploy internal certs.If you’d like to do it this way you can skip the next block
If you don’t want to use the DNS API you can do it via directory/web server. This is somewhat simpler since it doesn’t require you to use/configure CloudFlare. The one downside is if you have you domain redirect to HTTPS via NGiNX you will have to change the HTTP config as below.
server {
    listen 80;
    server_name domain.com;

    root /usr/share/nginx/html/domain.com/public_html;

    location ^~ /.well-known/acme-challenge/ {
        try_files $uri =404;
    }

    location / {
        return 301 https://domain.com$request_uri;
    }
}


acme.sh --issue -d domain.com -w /usr/share/nginx/html/domain.com/public_html;
This will allow the acme.sh well known to not be redirected to HTTPS since Certbot requires HTTP access.
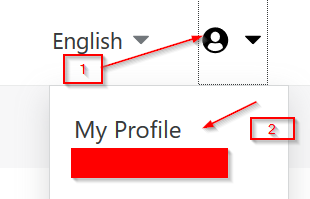
We have to create the CloudFlare API Key
- In the upper right hand corner

-
Then you go to “API tokens”
-
Then “Create Token”
-
Then “Create Custom Token” at the bottom of the page
-
You have to assign the following permissions
a. Zone.Zone:Read
b. Zone.DNS:Edit
c. You can adjust other settings if you’d like, but I usually just leave them as they are. I like to have a token for each server.
Now it’s time to configure acme.sh to use the DNS API with acme.sh
CF_Token is the key you just created above
CF_Account_ID is the code from you URL between the dash.cloudflare.com and profile. For example it’s the X’s in the below
https://dash.cloudflare.com/XXXXXXXXXXXXXXXXXXXXXXXXXXXXXXXX/profile/api-tokens

export CF_Token="sdfsdfsdfljlbjkljlkjsdfoiwje"
export CF_Account_ID="xxxxxxxxxxxxx"
Now it’s time to generate the cert/key
acme.sh --issue --dns dns_cf -d domain1.com
If you want to add more than one domain to the cert you can do the following
acme.sh --issue --dns dns_cf -d domain1.com -d domain2.com
Assuming that it worked it should so you the cert/key is in /root/.acme/.
Now it’s time to install the cert to NGiNX. This will work with Apache, but locations will be different.
export DOMAIN=domain.com
mkdir -p "/etc/nginx/ssl/${DOMAIN}/"
acme.sh --install-cert -d ${DOMAIN} --cert-file "/etc/nginx/ssl/${DOMAIN}/crt" --key-file "/etc/nginx/ssl/${DOMAIN}/key" --fullchain-file "/etc/nginx/ssl/${DOMAIN}/fullchain.crt" --reloadcmd "systemctl reload nginx" --force
Now it’s time to edit your NGiNX config to to use these certs. This is the very basic server block. You will need to PHP handlers/root info
server {
    listen 443 ssl http2;
    root /usr/share/nginx/html/domain.com/public_html;
    ssl_certificate            /etc/nginx/ssl/domain.com/fullchain.crt;
    ssl_certificate_key        /etc/nginx/ssl/domain.com/key;
}
Now that you’d added the required info you can run
nginx -t
If this is successfull they you’re good to go. Now you can reload NGiNX
systemctl reload nginx
or
service nginx reload
Now it should be working. You can open your domain in your web browser and now you should be able to see that your cert is from LetsEncrypt.